Each time you plug a device into your computer, your PC automatically adds its information to your system’s registry. If you stop using the device, for example, past DVD drive, long-since replaced mice, USB drives and other hardware, its registry files can stay behind there. These files, usually called hardware ghost or ghosted or hidden devices, may cause problems to your system. Here is how to remove hardware ghost from your computer.
Hardware ghosts are often not a particular problem, and most users remain unaware of them, as they aren’t see in the device manager. However, sometimes they can create driver installation related issues as well as can slow down your PC.
Though you can manually remove hardware ghosts from your PC, here is an application called GhostBuster, which makes things quite easy. With it, you can check hardware ghost on your computer and get rid of them all in one go.
GhostBuster is simple to use. However, as with any program that make changes to the registry, you should use it with care. Before using the application, create a system restore point.

After installation run GhostBuster. It scans your registry and lists all your devices and drivers. It highlights items that are not in use.
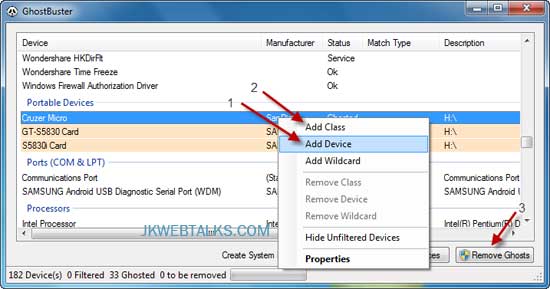
To remove device drivers from the list, right click its entry and select “Add device”. To add everything in a section, right click and select “Add class”. The items that are moved to removal list will be shown in red color.
Moreover, to show only the ghosted devices right click any entry and click “Unfiltered Devices”. To know the details of each driver, right click an item and select “properties”.

To remove ghosted driver, just click “Remove Ghost”. You may need to give administrative rights when prompted. After creating a restore point, it’ll remove ghosted hardware and restart your computer.
GhostBuster can be downloaded from developer’s site here.
Hardware ghosts are often not a particular problem, and most users remain unaware of them, as they aren’t see in the device manager. However, sometimes they can create driver installation related issues as well as can slow down your PC.
Though you can manually remove hardware ghosts from your PC, here is an application called GhostBuster, which makes things quite easy. With it, you can check hardware ghost on your computer and get rid of them all in one go.
GhostBuster is simple to use. However, as with any program that make changes to the registry, you should use it with care. Before using the application, create a system restore point.
After installation run GhostBuster. It scans your registry and lists all your devices and drivers. It highlights items that are not in use.
To remove device drivers from the list, right click its entry and select “Add device”. To add everything in a section, right click and select “Add class”. The items that are moved to removal list will be shown in red color.
Moreover, to show only the ghosted devices right click any entry and click “Unfiltered Devices”. To know the details of each driver, right click an item and select “properties”.

To remove ghosted driver, just click “Remove Ghost”. You may need to give administrative rights when prompted. After creating a restore point, it’ll remove ghosted hardware and restart your computer.
GhostBuster can be downloaded from developer’s site here.
Looks nice. Here's my only concern: Sometimes a single driver can power more than one device, and so its regsitry entry will contain all supported devices. By removing a registry entry like that, Windows can suddenly become aware of a driver that the user still wants for hardware that s/he's still using.
ReplyDeleteOne must be very careful about such things to ensure that one really and truly is removing OLD and NO LONGER USED hardware entries.
Even though this app is clearly very cool, and it clearly simplifies the task of removing no-longer-used hardware entries from the registry...
...I think that the old warning that if you don't really know what you're doing in the registry -- if you couldn't do it the techie way in the registry editor (without crashing or in any way breaking Windows) -- that you probably shouldn't be messing with it.
Moreover, it would take one heck of a lot of registry entries for no-longer-used hardware to sufficiently clog-up the registry that it actually slows anything down. That being the case, I wonder if it's really worth the risk.
Just a thought.
___________________________________
Gregg DesElms
Napa, California USA
gregg at greggdeselms dot com